Creating high performance particle effects
Creating high performance particle effects
With thegrowing popularity of Sparticle, and its increased usage in fields like Gamedevelopment, performance is of significant importance to most developers.Besides the quality of an effect, performance considerations like renderingcost, initializing cost, and memory usage are key factors in deciding whetheran effect is formally released with a product. Although the underlying architectureoptimizes performance to the best possible levels, this article offers a fewtips for creating high performance particle effects.
Particle Number v/s Rendering Area
Thetraditional approach is for designers to use the particle count as an indicatorof performance. This approach limits the options for creating particle effectsbecause of the trade-off between quality and performance. This is whereSparticle helps. Following is a comparison between two approaches:
Figure 1 Figure2
Figure 1 runssmoothly in spite of containing 5000 particles. Figure 2, on the other hand,contains only 100 particles but does not run smoothly. (If you have a powerfulGPU, both the examples will probably run smoothly. Fork the examples on thewebsite and set the number of particle to a larger number before trying again.)
It is probably evidentthat the rendering area is a key factor in this situation. Figure 1 has multipleparticles, but each particle is very small in size. Figure 2 has fewerparticles that are much larger in size. In the GPU pipe line, the particles arefirst separated into vertices. The vertices are then passed to the ALUs (Arithmeticand Logic Units) to calculate the required data (for example, time, color,position, etc.). The GPU then combines the vertices into triangles. Every pixelin each of the triangles corresponds to a pixel on the screen. At the sametime, the GPU also calculates pixel data based on the data provided byvertices. Next, the GPU calculates the final color for each pixel in thetriangles, based on the data of each pixel. The GPU then calculates the finalpixel color on the screen by blending the pixels in triangles. Assuming thatthere are 5000 particles, each of them having 4 vertices, the GPU will need tocalculate data for 20000 (5000*4) vertices. If a particle takes up 1/4thof the screen area, assuming the resolution is 1920*1080, the particle requires1920*1080/4=518400 pixels to be calculated. It may seem that vertex calculationis more complex than calculation for pixels. However, the numbers for verticesand the numbers for pixels are not at par. This means that the rendering area hasa greater impact on GPU performance than the number of particles does.
Whenrendering a particle effect in a traditional system, the CPU traverses all theparticles in the effect to calculate required data. Too many particles in aneffect can overload the CPU. Designers are therefore compelled to reduce thenumber of particles in a traditional system. Fortunately, Awayeffect Editor is solelyGPU accelerated. This means that the CPU does not perform any calculations forrendering (the exception to this behavior is explained later in this article). Youcan use Scout to analyzeyour application’s performance. You will notice that the CPU usage is almostzero. With Sparticle, this means that the CPU remains unaffected by the numberof particles you create.
In summary, paymore attention to the rendering area rather than the number of particles. When theparticles are small in size, you can increase the number of particles at will.
Rendering Opaque Objects
When creating an effect, you need to setthe blend mode in the materialsection.
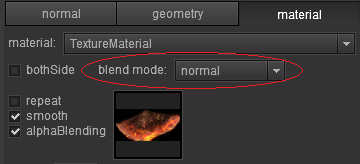
Figure3
If youwant to choose normal for blend mode, there is another propertythat you need to pay attention to. See the following comparison:
Figure4 Figure5
Figures 4 and 5 are nearly the same, but there is a huge difference in the performance levels. (Ifyou have a powerful GPU, both the examples will probably run smoothly. Fork theexamples on the website and set the number of particles to a larger numberbefore trying again.)

Figure6
The propertythat makes the difference is alphaBlending.This property is disabled for the effect in Figure 4 and enabled for the one inFigure 5. When alphaBlending isdisabled in the normal mode, theobject is rendered as an opaque object. For the areas of the particles thatoverlap each other, if the GPU first renders the region in the front, it neednot process the rendering for the overlapped region that lies at the back. Thatis because an opaque object hides all objects that lie at the back. Since theregion in the front is the final output on the screen, there is no need tocalculate rendering for the region at the back. Although it is not possible to cause the GPU to always render the opaque objects near the view first (rendering order is determined by the index buffer which is predefined and it’s costly to update it before every drawing), performance is significantly improved by doing away with the processing forhidden areas.
Another advantagewith opaque objects is that you can make sure the object culling in the zdirection is correct. A closer inspection of Figure 5 will reveal that the orderin the z direction is incorrect. Some of the hidden objects have not been culled.For the sake of brevity, this behavior is not explained in the article. See http://en.wikipedia.org/wiki/Z-bufferingfor more information.
It is thereforebeneficial to disable alphaBlendingfor opaque particles (like leaf, stone, etc.). Another tutorial highlights that the mostcommon way of forming a particle is to use the billboard with an appropriatetexture. Using a real 3D model like in the earlier example may use up much moretime. This example uses the most common method for creating the effect of fallingleaves. The texture used is the one in Figure 7, with an alpha channel:

Figure7
Set theblend mode to normal, and disable alphaBlending. The result is as follows:

Figure8
Theoutput is not as expected. The transparent areas appear opaque. To solve thisproblem, you need another property – alphaThreshold.Set it to 0.5. Now if a pixel’s alpha value is greater than 0.5, the pixel is preserved,else it is discarded. Following is the final result:
Figure9
Toenhance performance, use this tip for effects with opaque objects.
The impact of animation number
Avisually appealing effect generally combines a couple of animation effects intoone complex one. The following example discusses the impact of combined animationnumber:
Figure10
The effect in Figure 10 appears to be similarto the one in Figure 1. Figure 10 includes 100 animations, each of whichcontains 50 particles. The effect in Figure 1 includes 1 animation containing50000 particles. The total number of particles in both examples is the same.However, performance is much worse in the latter example. The GPU performs adrawing operation once for each animation. For each drawing operation, the GPUneeds to change its state to prepare the data for rendering. This means thatthe GPU cannot run at high speed for a very long time. This is analogous torepeatedly accelerating and braking while driving a car. It makes it impossibleto achieve high speeds.
Reduce the number of animations as far aspossible if you want to see an improvement in performance. This approach mayaffect the quality of the effect. Following are some quick tips for combininganimations while still maintaining the quality.
If the animations exhibit the same behavior and differ in the initial size androtation of the particles, you can use the modeltransform function. For the sake of convenience, models used earlier inthis article are used to demonstrate this function:
Figure 11
Each model has a different size and a different direction. The key is model transform:

Figure12
This use of this setting is intuitive. You can fork this effect to understandhow it is set.
If the animations exhibit the same behavior and differ in textures, you can use uv transform. See Figure 13:
Figure13
The texture in this example is made up of 4 sub-textures:
 .
.Use any picture tool of your choice to createthis kind of texture. Notice that this texture needs to be split into grids ofthe same size where then each sub-texture takes up a grid. In this example thetexture is split into 4 grids (2 rows and 2 columns). Following is the settingin sparticle:

Figure14
The index in Figure 14 indicateswhich grid is applied to a particle. In this example, we set Sparticle to randomlyselect a grid (from the 4 grids) for each of the particle.
If an effect is too complex to be created by normal behaviors, you can use Sprite Sheet Animation to implement youreffect. See Figure 15:
Figure15
This example simulates a flying butterfly. Asprite sheet picture is used as the texture:
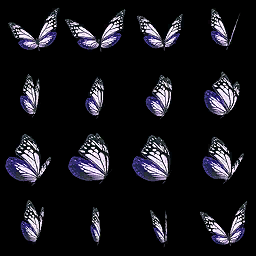
A SpriteSheet Animation node is then added as follows:
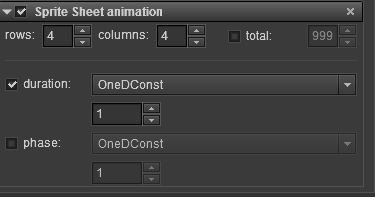
Figure16
Like in the case of uv transform, the texture needs to be split into grids. Each gridstores a sub-texture of one frame. Sparticle then plays the sub-texture to forman animation. The duration property defines the amount of time for which around is played. In this example, setting durationto 1 will result in a round being played for 1 second.
Trail effect
Two situations are possible when moving aneffect - moving with the effect container or not moving with the container. Thelatter is called the trail effect.The default setting is to move with the container. To observe moving an effectwith the container, go to the last section of http://www.effecthub.com/item/398 and click move in the lower panel.

Figure17
Following is another example:
Figure18
The only difference between the two examplesis that the Follow node is added forthe effect in Figure 18.

Figure19
To ensure the Follow node works as expected, enable the delay property on the Timenode and set it to a value greater than your frame time. For example, if your applicationtarget is 60 FPS, set delay to a valuegreater than 1/60. For the example in Figure 18, delay is set to 0.1 which ismuch greater than 1/60.
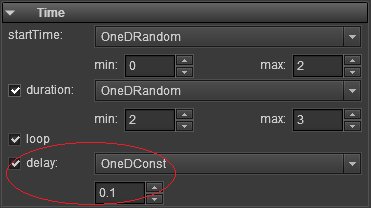
Figure20
The trailfunction thus makes the effect look natural. You may want to add this node toall animations. The Follow node isthe exception with regards to rendering calculations, discussedat the beginning of this article. If you add this node to an animation, the CPUwill traverse all the particles in the animation to calculate position datathus impacting performance for all the nodes. If the number of particles issmall, for example several hundreds, the cost of performance may be acceptable.However, if the number reaches tens of thousands the performance may drop to undesirablelevels.
Another drawback of the Follow node is that thememory can’t be shared across animation instances. For a normal animation, onlyinstance needs to be created. When you need more instances of it, you can clonethe existing one. That way all instances share one memory copy. But memory forthe Follow node is dynamic and cannotbe shared. Hence use caution when including the Follow node. Use the node only when necessary. For betterunderstanding see 2.awp in Sparticle’s samples where only Animation1 uses the Follow node.
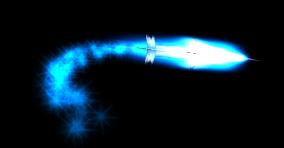
Figure21
Value Assignment for Node
You may at times encounter the following error:

Figure22
This error is a result of too many variables beingassigned to the properties of nodes. If a property for all particles in ananimation is the same, then the property is a constant, else it is a variable. Forexample startTime in the Time node is a 1D property. If you choseOneDConst as its type and set it to 1,as in Figure 23, all particles appear at 1 second. The property is thus a constant.

Figure23
If you choose OneDRandom and set it as in Figure 24, the particles appearrandomly between 0 to 10 seconds. The property is thus a variable.

Figure24
The underlying system uses constant registersto store constant values and stream registers to store variable values. Thereare fewer stream register than there are constant registers. For example, thereare 8 stream registers and 128 constant registers in Flash Stage3D. Another drawbackof a variable is that it needs much more time to initialize. Since constant data can shared between all particles, only a single copy of the data is needed.On the other hand, every particle needs a separate copy of variable data. It isthus beneficial to use constants as far as possible. The problem with registersis specific to the properties in Behaviors:
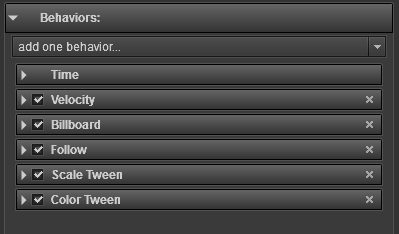
Figure25
For properties like model transform and uvtransform in the geometry section, no registers are taken up.

Figure26
If you have any questions or suggestions, please feel free to discuss with our online community below.
You must Sign up as a member of Effecthub to view the content.
A PHP Error was encountered
Severity: Notice
Message: Undefined index: HTTP_ACCEPT_LANGUAGE
Filename: helpers/time_helper.php
Line Number: 22







28090 views 34 comments
You must Sign up as a member of Effecthub to join the conversation.
A PHP Error was encountered
Severity: Notice
Message: Undefined index: HTTP_ACCEPT_LANGUAGE
Filename: helpers/time_helper.php
Line Number: 22
vigrx plus Capsules in Pakistan | results before after pictures ~ Call Now 03017722555
A PHP Error was encountered
Severity: Notice
Message: Undefined index: HTTP_ACCEPT_LANGUAGE
Filename: helpers/time_helper.php
Line Number: 22
very useful
A PHP Error was encountered
Severity: Notice
Message: Undefined index: HTTP_ACCEPT_LANGUAGE
Filename: helpers/time_helper.php
Line Number: 22
很多单词都连一块儿了 看着蛋疼
A PHP Error was encountered
Severity: Notice
Message: Undefined index: HTTP_ACCEPT_LANGUAGE
Filename: helpers/time_helper.php
Line Number: 22
very useful
A PHP Error was encountered
Severity: Notice
Message: Undefined index: HTTP_ACCEPT_LANGUAGE
Filename: helpers/time_helper.php
Line Number: 22
Looking forward to more tutorials!
A PHP Error was encountered
Severity: Notice
Message: Undefined index: HTTP_ACCEPT_LANGUAGE
Filename: helpers/time_helper.php
Line Number: 22
It's helpful to create a high level effect
A PHP Error was encountered
Severity: Notice
Message: Undefined index: HTTP_ACCEPT_LANGUAGE
Filename: helpers/time_helper.php
Line Number: 22
English tutorial may be more helpful for more users!