3 Photo Effects for Wedding Photographers
Here are 3 of the most popular wedding photo effects that every wedding photographer should know. In the first part, you'll learn how to access the hidden split toning presets and apply them so that they don't affect the tonal information in your photo. Next, you'll learn how to increase contrast in a B&W photo without clipping any highlights or shadows. This is especially useful in wedding photos where you have dark areas in the grooms tuxedo and bright areas in the brides dress. Finally, you'll learn how to use just one curves layer to create a popular film effect. This technique can be used in Adobe Lightroom 4 to create effects seen in many expensive Lightroom presets.
Video Tutorial
Split Toning
The first effect you will learn is split toning. Split toning is an effect that tints the highlights and shadows of your black & white photo to give it a two-tone color effect. You can do this easily in Adobe Lightroom but sometimes you need to do it in Photoshop for more control. Thankfully, Photoshop CS6 already comes with 32 photographer-created split toning presets.

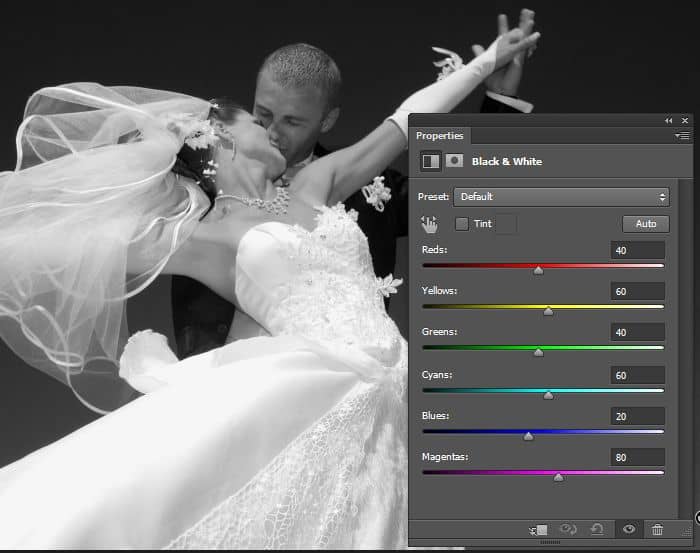
Before you apply this effect, you need to convert your image to a black and white photo. You can do this easily by adding a Black & White adjustment layer (Layer > New Adjustment Layer > Black & White). Feel free to make any adjustments you like or use the auto button to have Photoshop guess the best settings for you.
Next, add a Gradient Map adjustment layer (Layer > New Adjustment Layer > Gradient Map) then set the blending mode of this layer to color. This blending mode makes the layer affect only the color of the layers below and it’s useful when you want to protect or preserve the tonal information in your photo. Go into your Properties panel and click on the arrow button beside the gradient to bring up the gradient preset picker. In the preset picker, click on the presets menu and load the photographic toning presets.
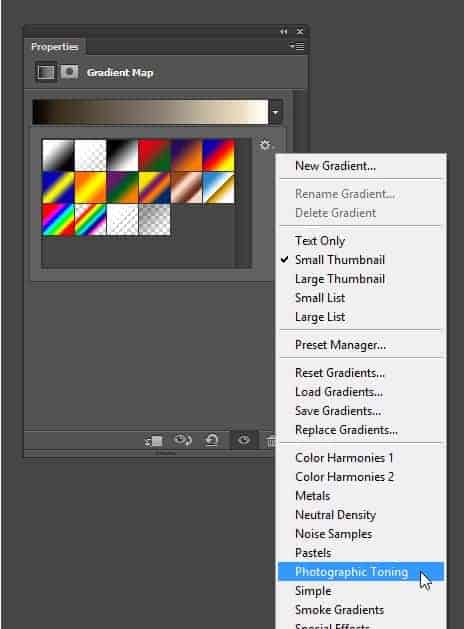
Photoshop CS6 has 39 built-in presets and they’re all created by a professional photographer. To make things easier, you can download a chart of all the toning presets here. Pick any toning preset that you want to use. Some of these presets can look overly strong but this is done purposely so that you can lower the opacity of the layer to fine tune your settings. After picking your tone, lower the opacity to get the results that you like. To adjust the balance of the colors, go into the gradient editor and reposition the colors.
![]()
![]() High Contrast Black & White
High Contrast Black & White
Sometimes when you convert an image to black and white it can look a little flat. So to improve it, you would add an adjustment layer to increase the contrast. The bad news is that this usually clips the shadows and highlights – especially for wedding photos of black tuxedos and white dresses. You can try using the curves tool to increase the contrast but you might get flat looking spots that make the image look even worse. The good news is that you can fix this and it’s easier than tinkering with the curves tool.

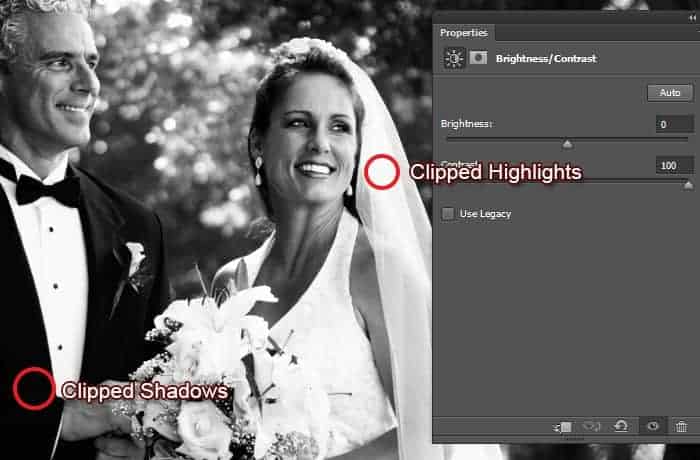
Here’s how to do it. First, open a black and white photo. You can use any tool you like to increase the contrast but to keep things simple, we’re just going to use the Brightness/Contrast adjustment (Layer > New Adjustment Layer > Brightness/Contrast). When adjusting the contrast, pay attention to the midtones and don’t worry about the clipping that occurs in the shadows and highlights. For our photo, we’re increasing the contrast to its maximum setting of 100. This looks great in the midtones but the shadows in the tuxedo and highlights in the dress gets clipped.
To fix this, we can use the blend if layer styles. This feature is extremely useful for professional photographers because they let you adjust where the layer is visible. To access it, right-click on the layer then choose Blending Options. In the blend if options, hold the alt key and drag the black input slider towards the right to restore the details in the shadows. Next, hold the alt key and drag the white input slider towards the left to restore the details in the highlights.
Use this technique any time you need to restore clipped shadows or highlights. It’s easier than using a layer mask and it’ll save you a lot of time.
Film Look
Finally, you’ll learn how to create this film look that’s popular with wedding photographers. It gives your photos a low-contrast effect and can make nearly all your photos look better. Many people pay a lot of money to buy Lightroom presets but we’ll show you how to make it yourself. This technique uses just one curves layer and you can use the same technique in Adobe Lightroom to create your own presets. You should have some knowledge about how curves work but we’ll show you it step-by-step so that you can understand what we’re doing.

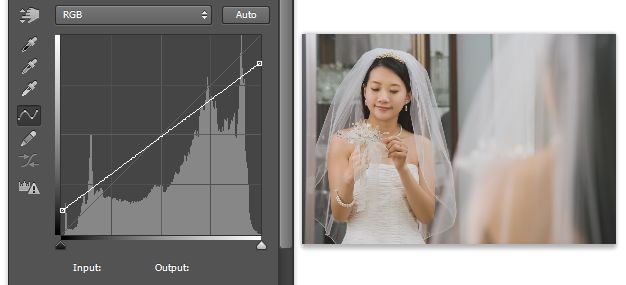
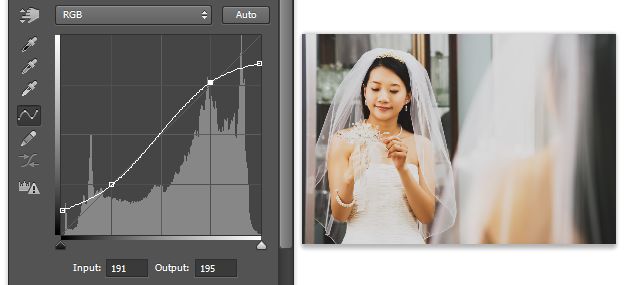
To start, create a new Curves adjustment layer (Layer > New Adjustment Layer > Curves). We’re going to begin by reducing the contrast of the photo to give it the film look. Drag the bottom-left point up. As you drag, you’ll notice that the shadows are getting brighter. Now drag the top-right point down slightly to make the highlights darker.
Now we have a low-contrast photo but it doesn’t look all that great; we only want the low contrast effect in the highlights and shadows but not in the midtones. So to correct this, create a S-shape curve to increase the contrast in the midtones. The curvier your S-curve is, the stronger your contrast will be. So try to keep the points near the diagonal line in the middle to keep the contrast subtle.
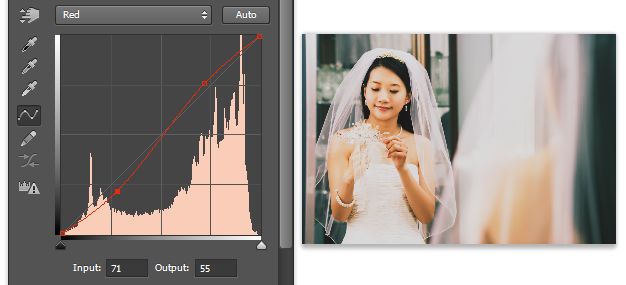
If you want to give it a lomography or expired film look, go into the the red, green, or blue channel and create a S curve to increase the contrast. In most cases, the red channel gives the best results.
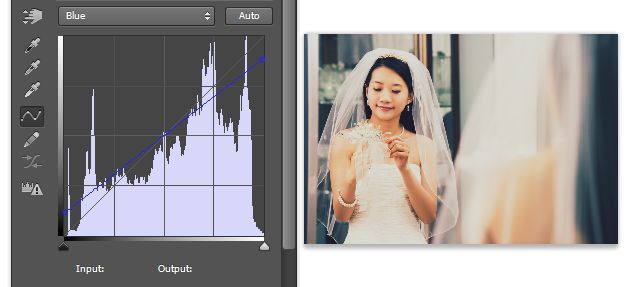
You can also tint the shadows and highlights with the opposite colors. For example, if you switch to the blue channel and drag the bottom-left point up, you’ll increase the blues in the shadows. Drag the top-right point down and you’ll increase the yellows which will balance the colors in the midtones.
Play around to create your own effects – there’s endless amounts of effects that you can create with the curves tool. If you want to see some examples, have a look at the Instagram and Prestalgia actions by SparkleStock – they all use RGB curves to create their look.
...You must Sign up as a member of Effecthub to view the content.

A PHP Error was encountered
Severity: Notice
Message: Undefined index: HTTP_ACCEPT_LANGUAGE
Filename: helpers/time_helper.php
Line Number: 22
3774 views 2 comments
You must Sign up as a member of Effecthub to join the conversation.
A PHP Error was encountered
Severity: Notice
Message: Undefined index: HTTP_ACCEPT_LANGUAGE
Filename: helpers/time_helper.php
Line Number: 22
beautiful!