Create a Fireball with 3D Studio Max and FumeFX
Introduction
Hello everyone, I'm here again with a new tutorial which will help you to make a fireball in 3ds Max. We will make this effect using a minimum amount of parameters, and use some tricks. So get ready for the fireball.
We'll be talking about a fireball with a huge smoke trail, you've probably seen such effects in game cinematics, war movies or science fiction movies, which can increase the look of certain shots.
In this tutorial, I'll show you how I created this fireball with the help of 3ds Max and the FumeFX Plugin. There are different types of techniques we can use to make this effect in FumeFX - e.g. Simple Sources, Object Sources, Particle Sources, etc. But this time we will use a Simple Source. And for this purpose we are going to use three different Simple Sources, some standard lights (Target Spot & Omni), and the default Scanline Renderer.
1. Create the FumeFX Simple Sources
As I mentioned before, there are different types of technique we can use to makethis effect, but we are going to use simple sources in this example. So follow these steps:
Step 1
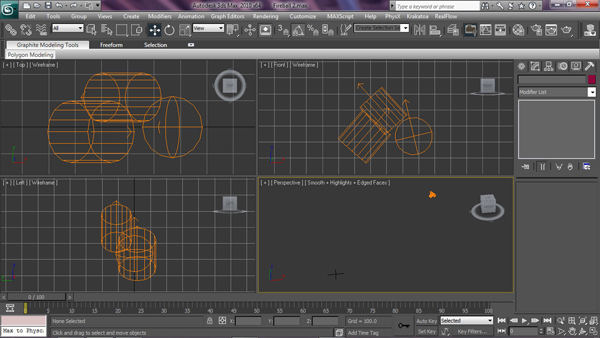
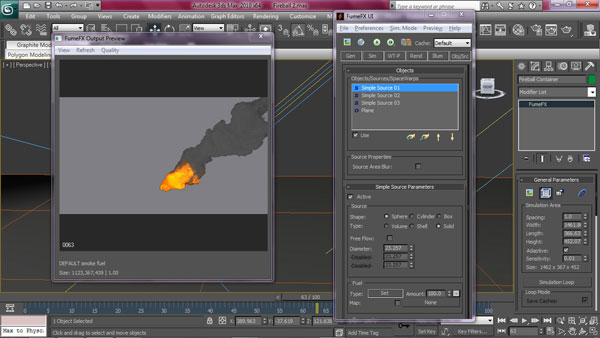
To Create a FFX Simple Source go to the Create Panel > Helpers, click on the drop-downmenu and select FumeFX.
Click on the Simple Src button and generate it in the viewport by clicking and dragging.
Step 2
We'll now adjust the position and rotation of the first simple source (FFX SimpleSrc01). You can do this by selecting the source and Right Clicking on the Move and Rotate tools to open the Move and Rotate Transform Type-ins and entering the values.
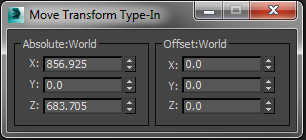
In the viewport position Simple Source 01 at these coordinates:
X : 856.925 | Y : 0.0 | Z : 683.705
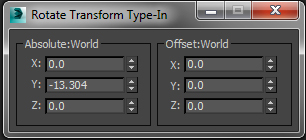
Rotation of Simple Source 01:
X : 0.0 | Y : -13.304 | Z : 0.0
Step 3
Add a second FFX Simple Source to the viewport by repeating Step 1 again. Adjust the position and rotation as follows:
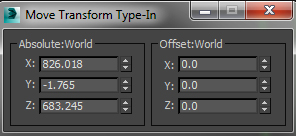
Position of Simple Source 02:
X : 826.018 | Y : -1.765 | Z : 683.245
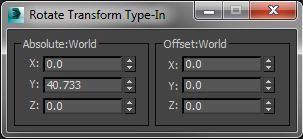
Rotation of Simple Source 02:
X : 0.0 | Y : 40.733 | Z : 0.0
Step 4
Finally add a third FFX Simple Source to the scene and adjust it's position and rotation as follows:
Position of Simple Source 03:
X : 837.963 | Y : 11.228 | Z : 699.334

Rotation of Simple Source 03:
X : 0.0 | Y : -42.45 | Z : 0.0

2. Creating and Linking the Dummy
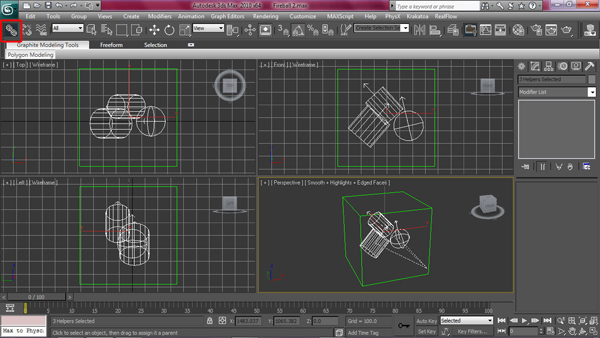
I know you might be asking "Why we are going to use a Dummy..??". This is because we are going to link all three SimpleSources to the Dummy, so we won't need to animate the Simple Sources individually,we’ll just animate dummy and the linked objects will animate automatically.
Step 1
To create a Dummy go to Create > Helpers > Dummy and click and drag in the viewport.
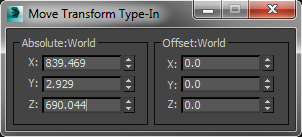
Position of Dummy:
X : 839.469 | Y : 2.929 | Z : 690.044
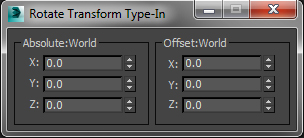
Rotation of Dummy:
X : 0.0 | Y : 0.0 | Z : 0.0

Step 2
Now select all Three Simple Sources and link them to the Dummy using the Select and Link tool.
4. Animate the Dummy
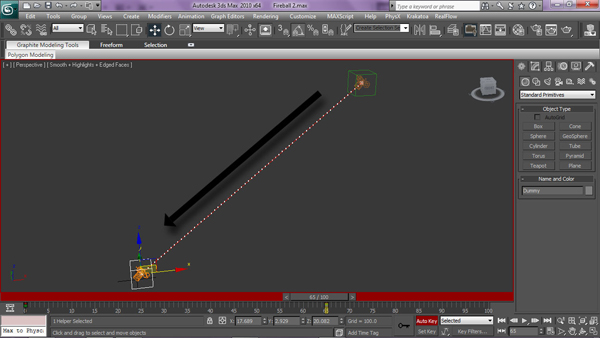
Step 1
Now it’s time to animate the Dummy. We are going to animate this dummy from frame0 to 65.
Select the Dummy, turn On the Auto Key button and with the time slider at at frame 0, position and rotate the Dummy as follows:
Position:
X : 839.469 | Y : 2.929 | Z : 690.044
Rotation:
X : 0.0 | Y : 0.0 | Z : 0.0
Step 2
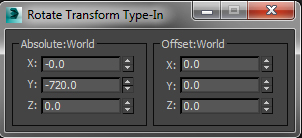
Now with the time slider at frame 65, position and rotate the Dummy as follows:
Position:
X : 17.689 | Y : 2.929 | Z : 20.082
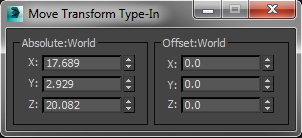
Rotation:
X : 0.0 | Y : -720.0 | Z : 0.0
After setting the position and rotation, turn Off the Auto Key button by clicking on it again.
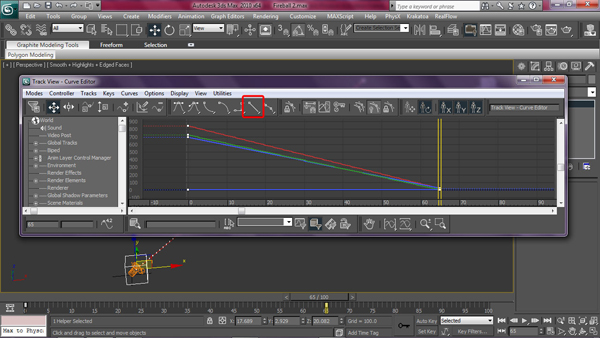
Step 3
Next we need to make the Dummy's animation linear. Select the Dummy, Right Click on it and select Curve Editor. Now select all the Key frames and make them Linear by clicking on the Set Tangents to Linear button.
5. Modify the Three Simple Sources
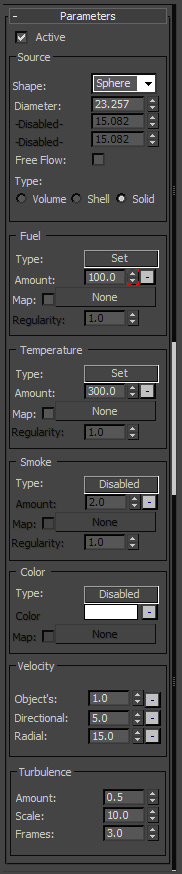
Step 1
Select Simple Source 01 and go to the Modify panel and make the followingchanges.
Source
Shape: Sphere
Type: Solid
Diameter: 23.257
Fuel: 100 (Animate to turn Off Fuelafter Frame 70.)
Temperature: 300
Smoke: Disable
Turbulence: No Changes
Velocity - Objects: 1.0 / Directional: 5.0 / Radial: 15.0
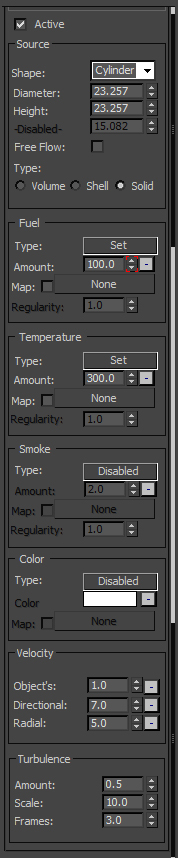
Step 2
Select Simple Source 02 and go to the Modify panel and make followingchanges.
Source
Shape: Cylinder
Type: Solid
Diameter: 23.257
Height: 23.257
Fuel: 100 (Animate to turn Off Fuelafter Frame 70.)
Temperature: 300
Smoke: Disable
Turbulence: No Changes
Velocity - Objects: 1.0 / Directional: 7.0 / Radial: 5.0
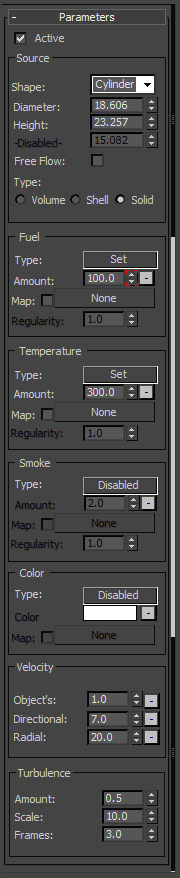
Step 3
Select Simple Source 03 and go to the Modify panel and make followingchanges.
Source
Shape: Cylinder
Type: Solid
Diameter: 18.606
Height: 23.257
Fuel: 100 (Animate to turn Off Fuelafter Frame 70.)
Temperature: 300
Smoke: Disable
Turbulence: No Changes
Velocity – Objects: 1.0 / Directional: 7.0 / Radial: 20.0

6. Create theFumeFX Container
Now it's time to create the FumeFXContainer. To create the container followthese steps. Go to the Create Panel > Geometry, clickon the Drop-down menu and select FumeFX.
Click on theFumeFX button and generate the container in the viewport by clicking and dragging. Next, rename the FumeFX01 to "Fireball Container".
Position and rotate the Fireball Container as follows:
Position:
X : 389.963 | Y : -37.619 | Z : 121.638
Rotation:
X : 0.0 | Y : -40.0 | Z : 0.0

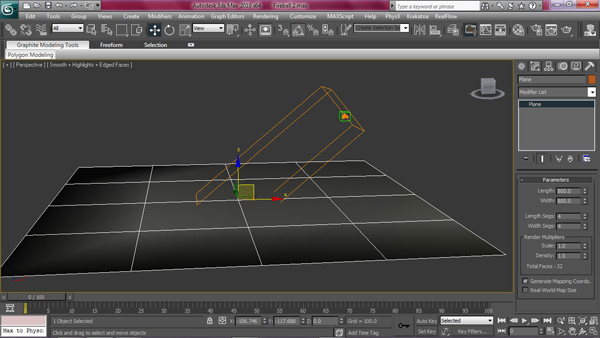
7. Createthe Ground Plane
Step 1
Create a Plane to deflect the fire and smoke when it hits the ground. To create the plane go to Create > Standard Primitives > Plane and create it in the viewport by clicking and dragging.
Position it at:
X : 0.0 | Y : 0.0 | Z : 0.0
Set both the Length and Width values to 800.
8. Edit the FumeFX Container
For the FumeFX Container (FireballContainer), thereare five important sections of FumeFX we are going to modify.
A. Gen – General
B. Sim – Simulation
C. Rend – Rendering
D. Illum - Illumination
E. Obj/Src - Objects & Sources
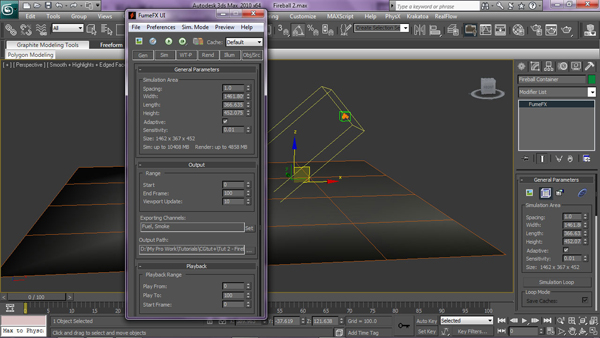
Step 1
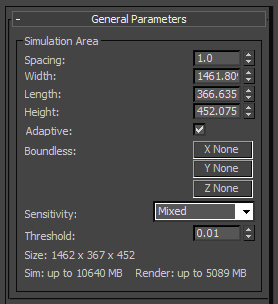
Open FumeFX, go to the Gen tab and set the following parameters for each section.
A. Gen Tab:
General Parameters:
Spacing:1.0
Width: 1461.809
Length: 366.635
Height: 452.075
Adaptive: On
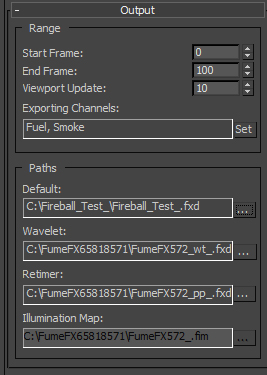
Output:
Start:0
End Frame:100
Exporting Channels: Fuel, Smoke.
Output Path: Click on Small Button next to Output path, Make a New Folder on yourStorage Drive & Save your cache file (fxd) as "Fireball_test_" inthat Folder.
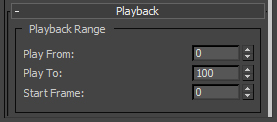
Playback:
Play From: 0
Play To: 100
Start Frame: 0
Step 2
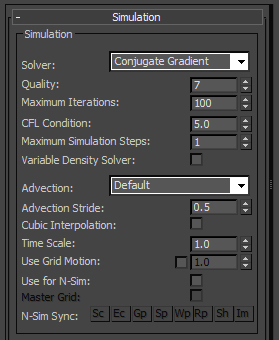
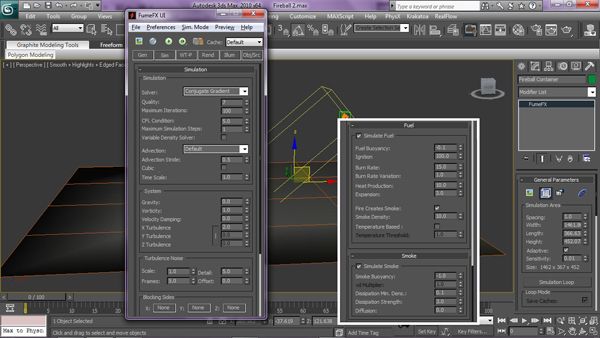
Go to the Sim tab and set the following parameters for each section.
B. Sim Tab:
Simulation:
Quality: 7
Maximum Iteration: 100
CFL Conditions: 5.0
Maximum Simulation Steps: 1
Advection Stride: 0.5
Time Scale: 1.0
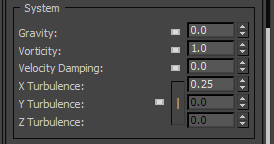
System:
Gravity: 0.0
Vorticity: 1.0
X Turbulence: 0.25
Turbulence Noise:
Scale: 1.0
Frames: 5.0
Detail: 5.0
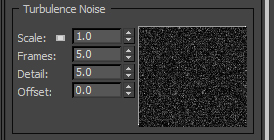
Tip - Turbulence Noise is veryimportant to define the hugeness of smoke.
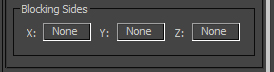
Blocking Sides:
X : None | Y : None| Z : None
Simulate Fuel:
Ignition: 100.0
Burn Rate: 15.0
Burn Rate Variation: 1.0
Heat Production: 10.0
Expansion: 3.0
FireCreates Smoke: Checked
Smoke Density: 10.0
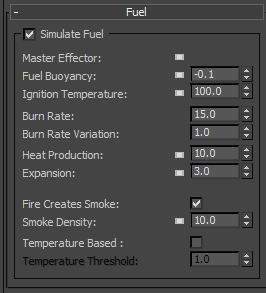
Note - Don’t change any parameters for Smoke orTemperature, keep them default.
Step 3
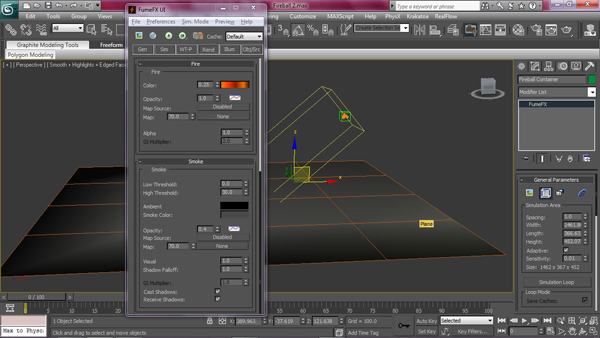
C. Rend Tab:
Rendering Parameters:
We are not changing anything in this tab.
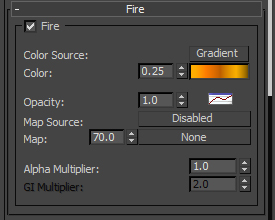
Fire:
Color: 0.25
Imade a color gradient asset for the fire (download above), you just have to load it into the Color channel.
Smoke:
Ambient: R : 0 | G : 0 | B : 0
Smoke Color: R : 72 | G : 72 | B : 72
Opacity: 0.4
Cast Shadows: Checked
Receive Shadows: Checked
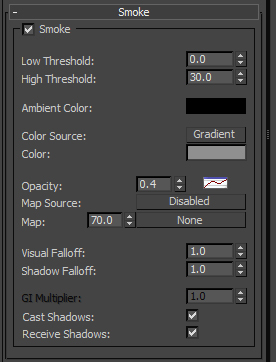
Note: Keep all other parameter as default.
Step 4
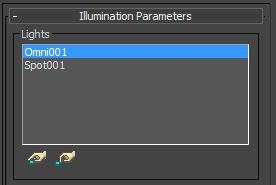
D. Illum Tab:
Before we start working on this tab, we have to add some lights. We will use two Standard Lights. A Target Spot and an Omni.
Create a Target Spotlight by going to Create > Lights > Standard Lights > Target Spotlight and dragging in the viewport.
Position the light at the following coordinates:
X : -2615.007 | Y : -2123.166 | Z : 1415.535
Position the Target at:
X : -13.825 | Y : 0.0 | Z : 200.066
Next, go to the Modify panel and adjust the Light's settings:
Turn On Shadows.
Multiplier: 0.8
Go to the Shadow Parameters rollout and turn On Atmosphere Shadows.
Note - Keepeverything else at default.
Create an Omni light by going to Create > Lights > Standard Lights > Omni and clicking in the viewport.
Position the light at the following coordinated:
X: 1779.888 | Y : -1052.7 | Z : 562.186
TurnOn Shadows
Multiplier - 0.3
Goto the Shadow Parameters tab and Turn On the Atmosphere Shadows.
Note - Keepeverything else at default.
Finally, add these lights to FumeFX by going to the Illum tab and picking them to add them into the Lights list.
Step 5
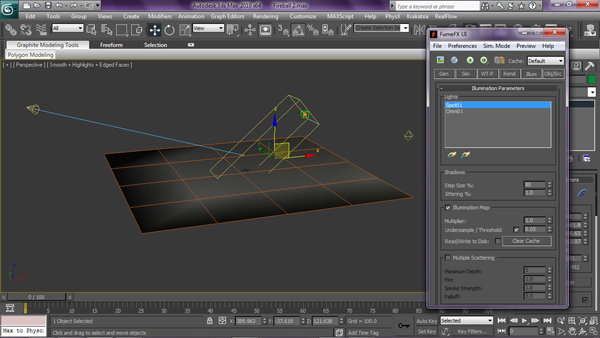
E. Obj/Scr Tab:
Note - This is Final Step before you hit the Simulation button.
Add all three Simple Sources and the Plane to the Objects Tab. When you select a FFX Simple Src, another tab will appear called Simple SourceParameters. Since we have already madeour changes to all three Simple Sources, we don't need to make any further changes. So lets start Simulation.
10. Startthe Simulation
Hit the Simulation Button. It may take around 4 or 5 hours for the simulation to complete depending on your system. So it's time to take a break, after allyou need some rest.
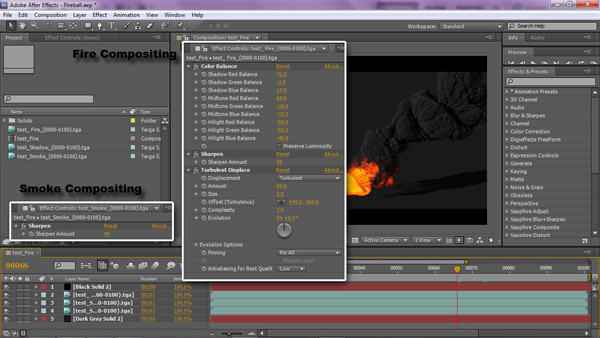
11. Rendering
After the simulation finishes, go tothe Render Setup by pressing F10 or by going to Rendering > Render Setup... Add the FumeFX Fire, FumeFX Smoke, and Shadow elements into the Render Elements list for better control when Compositing.
Now render the animation as an image sequence at an HDResolution of 1280 x 720.
12. Compositing
Open After Effects and load the image sequences you rendered from 3D Studio Max.
Now you can apply a few simple effects to the fire and smoke. For example:
Color Balance
Sharpen
Brightness & Contrast
Also add a new Solid layer into the background, and set the color to R : 25 | G : 25 | B : 25 to complete the shot:
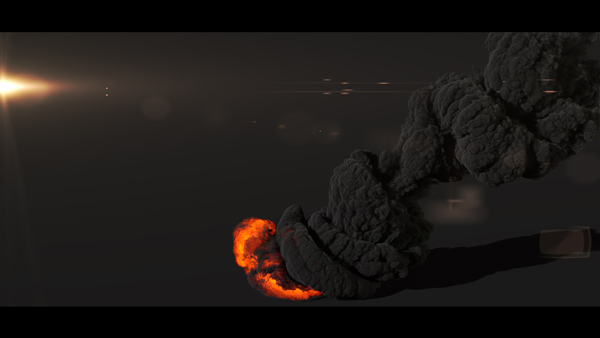
Final Output
Conclusion
The most important thing to make such effects is to always try differentparameters, again and again. First try this tutorial, thentry your own ideas. Try to use an Object Source with a Particle Source or a SimpleSource, change the parameters and see what happens. I want to see your tests whenyou finish this tutorial, but not the same as I have made. I want to see your owneffects.
From: http://cgi.tutsplus.com/tutorials/create-a-fireball-with-3d-studio-max-and-fumefx--cms-20397
You must Sign up as a member of Effecthub to view the content.
A PHP Error was encountered
Severity: Notice
Message: Undefined index: HTTP_ACCEPT_LANGUAGE
Filename: helpers/time_helper.php
Line Number: 22
2622 views 1 comments
You must Sign up as a member of Effecthub to join the conversation.